This blog post is a follow-up to my series of running CMDB for Azure resources. In the previous parts, I shared some guiding principles for organizing your CMDB using Azure tags, so here, I will cover some practical examples of keeping your Azure tags neat and structured at scale.
The issue with Azure tags from the CMDB perspective
Azure tag names and their values are just free text properties. You can choose whatever tag name and its value you want to apply to your resources, provided they are according to the Azure tag limitations. On the one hand, it’s great because you have much flexibility in defining your tagging convention. On the other hand, your tag list can quickly become a mess as there are few to no default controls to validate them.
For example, you want to tag your resources with an internal application name and a reference to a resource owner. By default, nothing prevents you from tagging resources like follows:
- Resource 1 (tag name: tag value)
App_name: MyApp1owner: Jhon Doe
- Resource 2 (tag name: tag value)
Application: MyApp1_Owner: john.doe@contoso.com(here underscore in the front stands for a space character)
As you can see from that example, those resources likely belong to the same application and to the same owner. However, tag names and value formats vary significantly. That might not be a problem if you manage a dozen resources manually, but it will become a huge automation challenge at the enterprise scale with thousands of resources, applications, and users involved when it’s impossible to logically organize your assets without technical means. So, let’s recap first what we can do to enforce specific tags are applied to Azure resources.
Enforce tags on your Azure resources
Azure policy definitions for tag compliance would definitely be a good place to start governing your tagging convention. Generally, those policies can be grouped by the control they implement. There are built-in policies to:
- require a specific tag (they will deny resource deployment without it),
- inherit a tag from a parent resource container,
- add/append a tag.
From the enforcement perspective, the policies that require and/or inherit tags are the ones that can help you to push your tagging requirements. The policies to add or append tags are usually helpful for remediation purposes when you want to apply specific tags to different scopes.
Those built-in policies are missing examples for auditing your Azure resources for tag compliance, but it’s pretty easy to create your custom ones using the require-tag policies as a starting point. You can find such policy samples in my Azure Policy GitHub repository.
When designing your tagging convention, you might come up with a list of mandatory tags and optional ones, where the mandatory tags are absolute must for your inventory purposes, and resources cannot be deployed without them, whereas the optional tags are not strictly required but suggested for application teams to use according to their needs. It is also common for the optional tags to have some suggested naming and value format to follow so they are consistent with your overall tagging structure. Therefore, for the mandatory tags, you would usually use require-tag policies, and for the optional tags – audit-tag ones (to keep track of their usage).
As a rule of thumb, when assigning your Azure policies requiring specific tags (denying resource deployment without them), specify the corresponding custom non-compliance messages that clearly explain what went wrong and how to fix it. An error message like the following one can save you thousands of hours and empower users to correct their deployment without raising a support ticket:
Azure resources must be tagged with the mandatory ‘<tag_name>’ in the following format: <tag_name:tag_value>. Please refer to KB#### (<knowledgebase_URL>) for additional details.
Having those controls in place can help you to keep your tag names consistent. Now, let’s see what we can do to validate tag values.
Validate tag value formatting
Here I will use some suggested tags from my previous blog post to make my examples more practical.
Make sure to check my list of Azure Policy best practices for crafting your custom policies like using parameters, testing, deploying, etc.
For example, the Application Name tag is usually used to mark resources related to specific applications in the context of your organization. Depending on your requirements, its value might be just a free text or a text in a specific format according to your internal app/system encoding pattern:
The Service Map and Documentation tags can be URL links pointing to specific resources containing a live service health map and internal documentation/wiki. To enforce the URL pattern for tag values, you can use the following policy rule condition:
Similarly to the mentioned URL pattern validation, you can put a control to require the Owner and Technical Contact tags value to be in the form of an Email address:
Such tags as Business Unit, Data Profile, Service Class, and Criticality usually represent predefined lists of allowed tag options. For example, you can define the Data Profile tag to use only specific profile values:
If you rate your Service Classes or application Criticality using numeric values, that validation approach will work too. Just keep in mind that numeric values are treated as strings here:
For date-related tags such as Created Date, you can ensure proper formatting using the following policy rule condition:
Unfortunately, Azure Policy conditional operators don’t support regular expressions (aka regex). The closest expression validation you can do is by using the (not) like and match operators, and you might need to additionally validate tag values for more complex string patterns. More on that is in the next section.
Please check my Azure Policy GitHub repository for the complete sample policy definitions.
Such Azure policies should help you keep your tags and their values more consistent across your resources. However, tag values are still just plain text properties with enforced formatting. So, what to do to ensure that a specific object your tag represents, like a user email address, exists in your systems of records?
Automate your Azure tag validation processes
As I mentioned earlier, tags like resource Owner, Technical Contact, or Budget Approver are usually specified as a user email address, which serves as a unique user identifier and provides an immediate contact point for communication with users using automation channels. However, enforcing the Email format validation with Azure Policy doesn’t prevent an editor from putting a mistyped or non-existing email address. Although Azure doesn’t offer any native capabilities for tag value validation, it has all the building blocks you can use to build your custom validation processes.
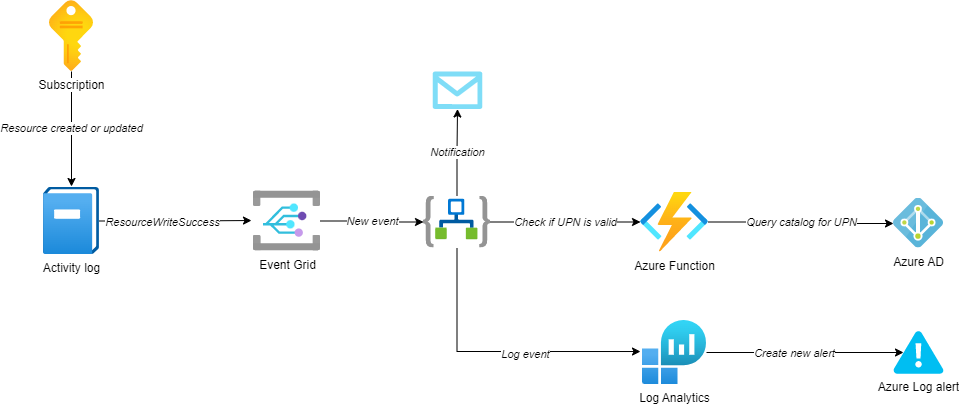
For example, you can subscribe to your subscription Activity logs with Event Grid and then use Azure Functions / Logic Apps to process those events by looking for specific tags. The automation workflow can query your Azure AD to check if an entity with a specific email address exists and it’s active. Additionally, it can check if that email address belongs to a user or group account and implement some conditional logic according to your needs. If the email address is invalid, the workflow can send out a notification or log the event in a Log Analytics workspace with a corresponding Log alert rule configured to create alerts according to your unified monitoring process.

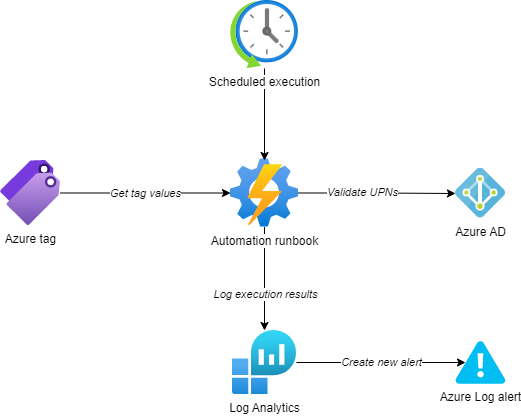
As email addresses can become invalid due to changes in Azure AD, it also might be helpful to set up scheduled check-ups for Azure tags representing emails and run periodic scans for all such tags:

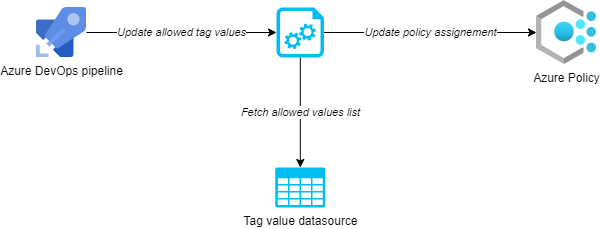
Tags representing cost centers can rely on a fixed list of allowed values, but that list also might require periodic updates if the cost center structure in your organization changes. Such an update process can be implemented as a part of your deployment pipeline when you manage your Azure Policy via code:

Or, it can be independent of the policy deployment and implemented with an automation helper that pulls the list of valid cost center values from an external data source and updates the corresponding Azure Policy assignment with the new list of allowed tag options via a policy parameter.
After the policy is updated with the new allowed cost center list, some of your recourse might become non-compliant, so make sure you check and update invalidated tags with correct values. You can take it even further from there and configure Azure Monitor alerting for non-compliant resources.
As with many IT systems, there is no single best implementation of those processes, and the final design heavily depends on your specific requirements and constraints. Nevertheless, I hope the described approaches to validating Azure tags can make your work easier and help you to maintain your CMDB records consistent across the related systems.
How do you validate Azure tags in your environments? Please, share your ideas and questions in the comments 👇

Member discussion: