How to sign your commits with GPG, Git and YubiKey
Last week, I finally managed to get my hands on a YubiKey 5 NFC I ordered last Christmas and configured it to sign my commits on GitHub. By signing your commits, you can let other people know that the changes come from a trusted source if, of course, people trust your digital identity. I hope this guide will be helpful for anyone who wants to start signing their Git commits and make it work with a security token like YubiKey.
Digression. Initially, I intended to use a YubiKey as a hardware key for my digital signature that I use for signing my tax reports in Ukraine. In the configuration process, I discovered that instead of using industry standards of digital signature algorithms, the Ukrainian government decided to use a custom variation of the ECC algorithm defined by DSTU 4145-2002 state standard. Unfortunately, that algorithm is not yet supported by YubiKey firmware or any other popular cryptographic software. Still, I decided to put my YubiKey to work.
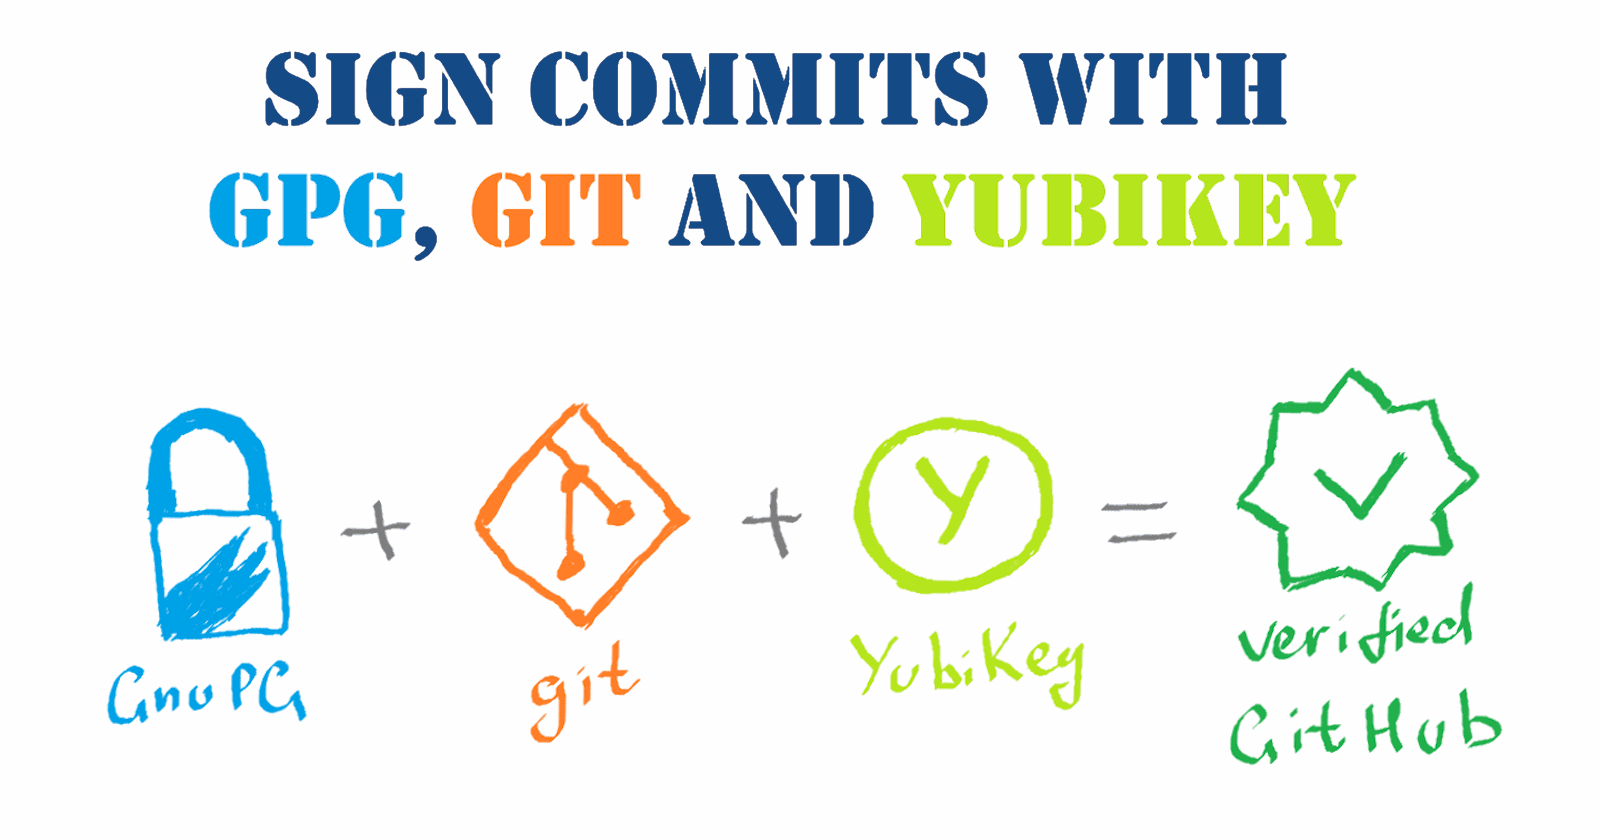
Technically, you can use both GPG and X.509 (S/MIME) keys to sign your commits, and it is only a matter of preference using WOT or PKI for your identity verification. I chose GPG, and now the result of my efforts looks like the following:

So, let’s go through the setup process step-by-step and talk about creating your signature, storing the private part of a key pair on a YubiKey and configuring your Git account.
Creating your signature with GPG
First, you need GPG to be installed on your machine. For the majority of Linux distributives, it comes preinstalled, but for Windows or MacOS, you need to download and install an appropriate binary release. In my case, as I work on Windows, Gpg4win contains all the necessary software to work with the keys. The installation process is pretty straightforward, and after the installation, you can use the command line ‘gpg’ utility or the graphical Kleopatra application.
Although the usage of GPG is well-documented, it requires considerable time to become familiar with all its basic concepts. It is definitely worth the effort, but for a quick start, I suggest following the instructions in the following guide.
As a best practice, it is suggested to create a key hierarchy with a master key and subkeys. Keep the master key in a safe place and use it only to issue and certify your subkeys – ‘...to rule them all.’ In that sense, you can think of the master key as a root key in your certification authority (CA) if you are more familiar with the PKI concepts.
Before starting your key generation process, check your security token specification for the list of supported key algorithms. The YubiKey 5 Series tokens officially work with RSA keys up to 4096-bit long. However, I created my subkeys in ECC format, as the actual list of supported formats is much larger.
Also, depending on your security level tolerance, you can decide on how long your keys should be valid. For example, as I am not going to use personal keys for anything top-secret, I set my master key never to expire and my subkey to expire in ten years so that I do not have to bother with key rotation.
Pay attention to the fact that the secret (private) part of the keys cannot be exported from a YubiKey by design. It is not suggested to generate your master key directly on YubiKey because you cannot create a backup copy of the key or a copy of your security token. If your YubiKey is damaged or lost, your security keys are gone. If I were you, I would use YubiKey to hold only the secret part of the subkeys I use to sing, encrypt or authenticate with GPG.
When your keys are ready in your local GPG vault, test them locally by signing/verifying and encrypting/decrypting some test files. You must also tell your local Git about your signing key.
Store your secret subkeys on YubiKey
So, up to this point, you created and worked with your keys stored in the local keyring store provided by GPG utility. Frankly speaking, you already can start signing your local Git commits, skip the YubiKey part and just configure your GitHub account to verify your signatures. However, what if you want to be able to use your keys on different machines? For instance, to be able to use the signature on your work laptop and your home PC. Literally, to make your keys transportable.
Although you can perform the same steps to set up and configure GPG on another computer and copy your keys on it, it will make the keys less secure. How can you be sure that another computer is a safe place for keeping your secret keys (you need the secret part specifically to sing your code)?
Here, security tokens such as YubiKey come into play. Basically, they are small, easily transportable hardware devices that can keep your secrets: keys, certificates, and static passwords safe. Often, they provide additional functionality such as OTP, dynamic passwords and so on, but for our purpose, we will be focusing on their smart card features to store your PGP keys.
I will be using my YubiKey to store the secret part of my signing subkey so that I can safely use it on different computers. Why subkey only? Remember, I told you that you cannot export your secret keys from the token. If I lose a token with my signing subkey, I can use my master key to certify my new signing key and be good to go again.
Before moving your signing subkey, its private part, to a YubiKey, I suggest creating a backup copy of all the keys in your local GPG keyring. You know, backup never hurts if something goes wrong 😊
Firstly, you need to prepare your YubiKey for using it. Download and install the YubiKey Manager. Although it has a friendly graphical application, I suggest using ykman, a CLI tool, for all configuration tasks. If you work on Windows, you also will need a smart card minidriver.
Secondly, get yourself familiar with ykman openpgp commands for configuring your YubiKey token properties and with gpg card commands and options so that you can understand what they are doing.
To configure the card and transfer your subkeys to it, I suggest following the instructions in the guide I already mentioned. During that process, you should pay attention to the following key points:
YubiKey PGP and YubiKey PIV are completely different firmware applets. What you can see in the YubiKey Manager graphical application is the PIV applet that has nothing to do with PGP configuration. It works with X.509 certificates. You can check this with ‘ykman openpgp info’ and ‘ykman piv info’ commands. For PGP keys, use the YubiKey PGP applet.
It might not be obvious, but as YubiKey PGP and YubiKey PIV are different applets, they have separate configurations for PINs. When you configure your PINs with the YubiKey Manager graphical application or with ‘ykman piv change-pin/ykman piv change-puk’, you actually configure the card PINs for YubiKey PIV. It took me some time to figure that out, so for setting up the PINs for you PGP keys, use gpg commands. YubiKey default values for the PIN, Admin PIN (PUK) and the management key are the same for both applets.
‘keytocard’ is a destructive action – it removes the private part of your key from your local gpg keyring and puts it onto the card, making it unexportable. So, ensure that you have a backup copy of that key if you are planning to export it somewhere, e.g., use it to create a backup token using another YubiKey device.
When editing your key(ring) with ‘gpg --edit-key,’ remember to commit all changes with ‘save’ command.
When you finished transferring your subkeys to a YubiKey, verify that the keys are on the card and try to sign some test files – you should be prompted for your PIN:

Now, if you want to use your configured YubiKey on another machine, just install GPG on it, import your public(!) key to the local keyring store, install Git, tell Git about GPG program location (git config --global gpg.program ‘path_to_gpg_executable’) and your signing key (git config --global user.signingkey ‘your_key_id’).
Setting PGP on a GitHub account
That part is probably the easiest one—just follow the instructions in the GitHub help and let GitHub know about your public key. The service will use this key to validate the signatures on your commits. The only thing to remember is that you should validate the email address specified in your key.
Sharing your public key
Strictly speaking, sharing your public key(s) is not required for signing your Git commits and getting them verified by GitHub, but it is a convenient way to let the public know about your digital signature and be able to verify it. Technically, you can place your public key on any Internet service you would like so that it is accessible at a public URI. For example, on your website or a public key server. Nevertheless, I recommend using Keybase service for hosting your public key(s) as it provides a convenient way to share your (public) key(s) across multiple devices:

For instance, my public key can be accessed at https://keybase.io/andrewmatveychuk/pgp_keys.asc and viewed in my Keybase profile:

To conclude, despite cryptography being quite a complex topic on its own, it’s really interesting and fun to learn. The intersection of math and technology provides us with lots of opportunities to solve common problems of security, privacy, verification of digital identity and more.
Are you planning to start signing your codework to prove its identity origin? Share your opinion on that topic in the comments!