A sample CI/CD pipeline for PowerShell module
Following my post on embracing DevOps practices in PowerShell automation, I decided to share a sample PowerShell module project with a CI/CD pipeline that would put the theory into practice. Here, I will discuss the same topics and describe the whole build process step-by-step.
Note. For the best experience, I suggest opening this article and the source code side by side so that you can easily follow the references to specific project parts.
Project structure and source code
The source code for the project is hosted in the ‘powershell.sample-module’ GitHub repository. The repository contains both the code for the sample PowerShell module and the configuration for its build process. I put all the module sources into the ‘SampleModule’ folder and kept everything else in the project root. This structure makes the sample more reusable so that you can fork or clone the repository to your local machine and make it fully workable with a minimum of tweaks.

If you check the module definition in the ‘SampleModule.psm1’ file, you might find it somewhat minimalistic. Basically, it doesn’t contain any functions and serves as a load script for individual function definitions located in the ‘Public’ and ‘Private’ subfolders. People who are already familiar with PowerShell module development might immediately recognize a definitive pattern when a module has some public functions to be exported and, optionally, some internal helper functions invoked from the public ones and not accessible to a third party. This pattern encourages you to define each function in a separate file and maintain a clean and intuitive codebase.
For the sake of simplicity, the module contains only one public function, which generates a range of GUIDs based on the input parameter. It has no fancy logic, just a function definition according to general PowerShell guidelines.
Pester tests
All project tests are implemented with the Pester test framework. What I like the most about Pester is that you write your test cases in the same PowerShell language, and, as a result, you can use the same scripting logic to make your tests dynamic. For example, the ‘SampleModule.Tests.ps1’ file contains some project-level tests that will be executed against the module definitions and all existing and future function definitions.
As functions generally implement different logic, these top-level tests for functions ensure only common code style and comment-based help quality. Individual function logic is tested with separate ‘functional’ test cases, which are defined in separate ‘*.Tests.ps1’ files.
If you look at test files from the project structure point of view, you can notice that I prefer to keep them alongside the source code they test. In that case, it is visually easier to check whether you have defined test cases for the specific part of your project.
Apart from that, I defined a separate set of project-level tests in the ‘SampleModule.PSSATests.ps1’ file. This test file is a wrapper for PSScriptAnalyzer, which checks the PowerShell code for coding standards. In my example, I just perform static code analysis with the default rules, but you can define your custom rules to ensure specific code standards for all your project code.
Build script and dependencies
Now that we have looked into the source code and the tests, it’s time to discuss how we will build our sample module. As I mentioned in my previous post, there is no need to reinvent the wheel and create your custom build tool. In my example, build automation is implemented with InvokeBuild, and all the build tasks are defined in a single ‘SampleModule.build.ps1’ file. This build script is well-commented, so I encourage you to go and look into its source code. Also, don’t forget to check the InvokeBuild wiki for a better understanding of the features and specifics of the build framework itself.
If you just want to test out the build script on your local machine, install the InvokeBuild module and type ‘Invoke-Build ?’ in a PowerShell session in the root project folder. For example, if you type only ‘Invoke-Build’ without any options, the default task will be executed, and a build will be produced in the ‘build’ folder.

That’s it. There is no need to manually download or install any other modules, packages or software, as all build dependencies will be handled by PSDepend (look for the ‘Enter-Build’ script block in the build script). The build dependencies themselves are specified in ‘SampleModule.depend.psd1’, which is just a simple PowerShell data file. PSDepend will go through the list of required modules in that file and download and install them in your build environment.
Azure DevOps pipeline
If you got to this part, you should have built your project locally. “What about the CI/CD pipeline?” you might ask. Let’s put computers to work instead of us.
In my example, I used Azure Pipelines to perform all the tasks required to test, build and publish the module.

If you check the pipeline configuration in the ‘azure-pipelines.yml’ file, you might see that continuous integration is pretty straightforward. The pipeline steps just invoke specific tasks, which are already defined in the build script. This allows you to keep build and pipeline logic separate from each other and makes it easier to maintain.
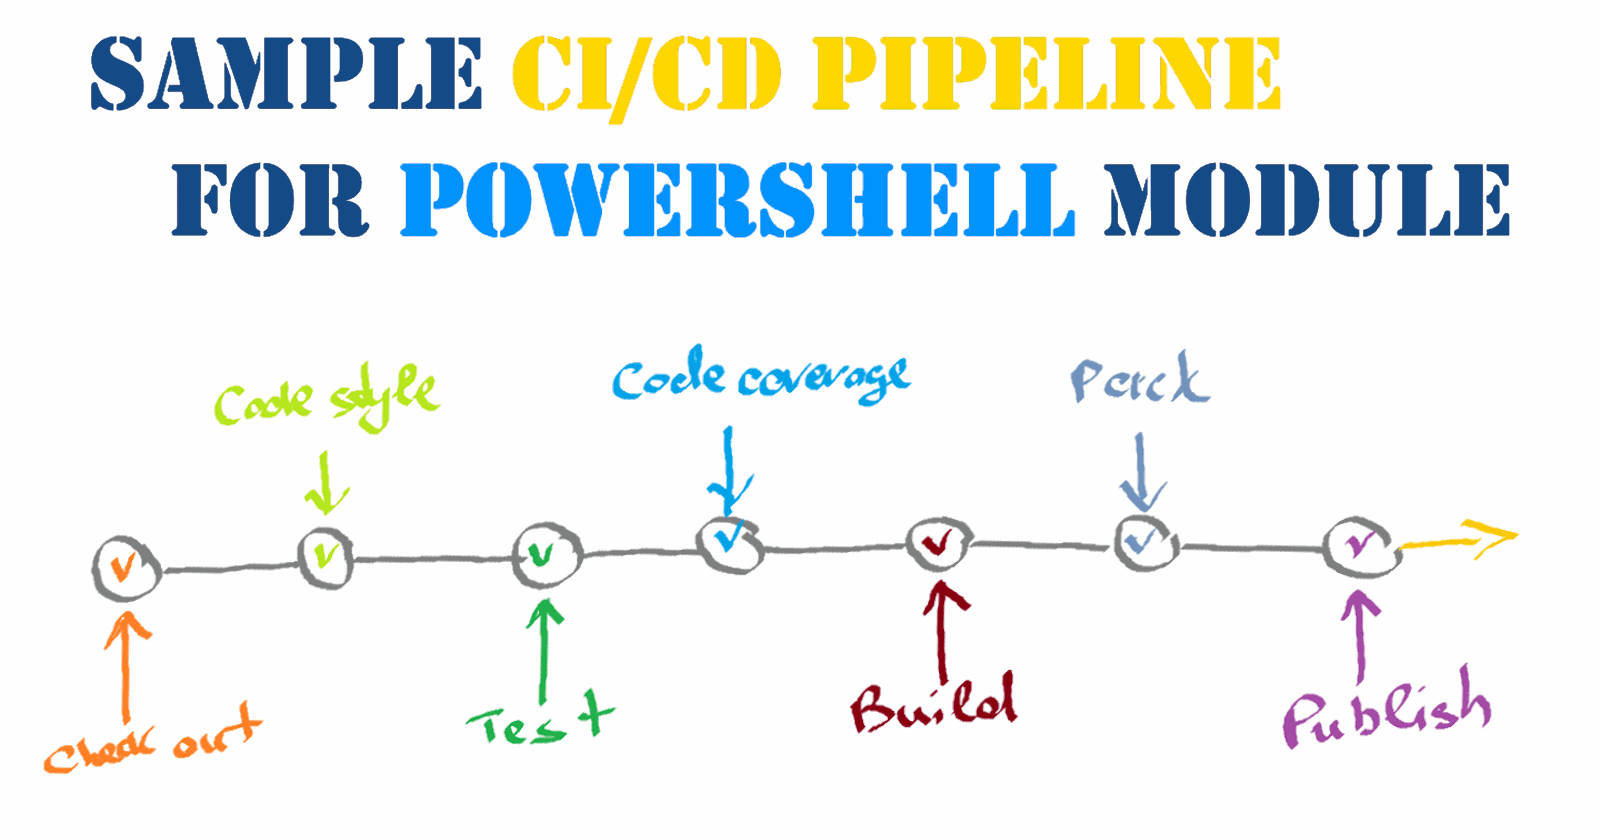
As PowerShell script modules don’t require compilation into binary format, for the sake of pipeline run time, I perform all tests and code quality checks first and then assemble the module package itself. If the project doesn’t pass the tests, there is no need to waste time producing a build. Basically, the test stage contains all the quality build gates: no failing tests, no PSScriptAnalyzer rule violations, acceptable code coverage level. All test results are published as artifacts and can be evaluated on the build results page.


Also, the build and publish stages are configured to produce ‘official’ builds only from the master branch.
The pipeline references a few project-specific pipeline variables:
module.Name– the name of your custom module;module.FeedName– the name of your PowerShell repository feed to publish your module;module.SourceLocation– the repository feed URL.
The last two are required to automatically version and publish the module in the Azure Artifacts feed.
Azure Artifacts as PowerShell repository
As PowerShell modules were intended to be reusable tools, it is a good idea to host them in a PowerShell repository for other people and processes to consume. With Azure DevOps, you can use Azure Artifacts to host your public and private PowerShell repositories for your modules.
PowerShell repositories are primarily based on regular NuGet feeds, and module packages are basically NuGet packages. To pack my sample module into a NuGet package, I defined its specification in the ‘SampleModule.nuspec’ file.
In my example, when creating a release build, the build script will query the target feed for an existing module package and version the current build based on the current published module version. The build will be published as a pipeline artifact and, at the publishing stage, will be pushed to the target Artifacts feed.

TODO
In this sample project, I haven’t covered the process of external documentation generation with platyPS or looked into the PowerShell scaffolding with Plaster. So, there is still room for improvement, and I encourage you to fork or clone this sample project and explore those additional topics on your own. Learning is fun!