
In my previous blog post, I showed how you could authenticate to Azure services other than using a username and password. Now, let’s explore some technical details for certificate-based authentication and how to implement it in your applications.
If you are wondering why you should prefer using certificates over client secrets, please check case #2 in the previous blog post in this series.
Overall solution design
From the overall design perspective, the required infrastructure configuration is mostly identical to what you might have when using app registration with client secrets to authenticate:
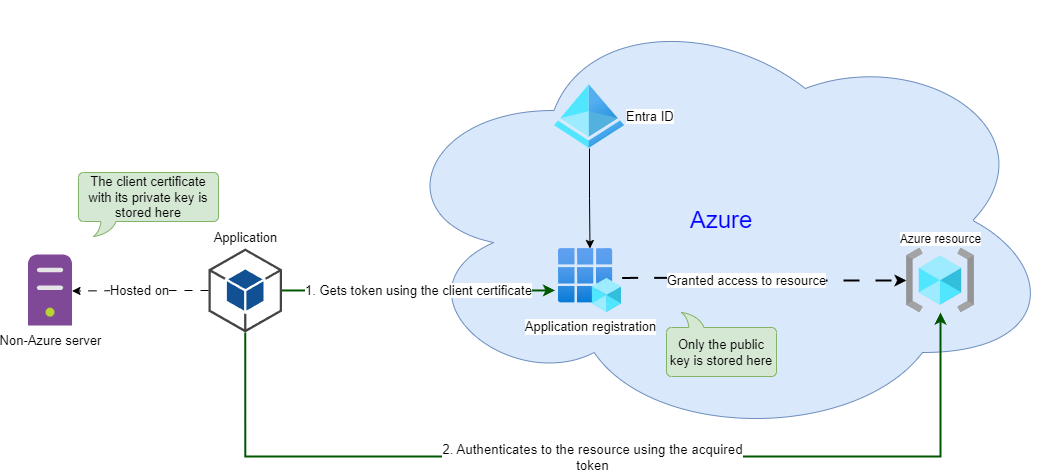
You register your application in Azure, assign permissions to that app, import the Azure Identity SDK in your code, and use the DefaultAzureCredential object or more specific credential types to authenticate to a target Azure resource.
Note. Here, I will use the Azure Identity client library for .NET to illustrate the concept. Using Azure Identity libraries for other programming languages should not be very different.
Unfortunately, most official tutorials focus on using client secrets specified in environment variables, and there are very few samples for using client certificates. So, let’s see how we can use them.
Generating and installing certificates
Before adding a certificate to your app registration, first, you must get one. You can either create a self-signed certificate or get a valid certificate from a Certificate Authority. Remember that only the public key of that certificate is saved with your app registration. The certificate private key should be accessible to your application where you host it.
If you create a self-signed certificate, its private key will already be stored in your computer’s Windows Certificate store. If you obtained your certificate from a CA or need to use it on another machine, you need to retrieve the certificate file containing its private key and import (or save) it on your target machine.
A .cer file contains only a public key, while a .pfx file can contain both public and private keys. For more certificate file formats, check the documentation for X.509 certificates.
In a production environment, certificates with their private keys should be imported into a certificate store as non-exportable if it’s a Windows host or saved into a designated folder with restricted access if it’s a Linux machine.
Ideally, you should configure your production certificates to be TPM-protected or use another verified hardware-based solution that protects from exporting private keys. However, it’s a more advanced topic well beyond this demo scope.
For the sake of this demo, I will use a self-signed certificate on a Windows machine:
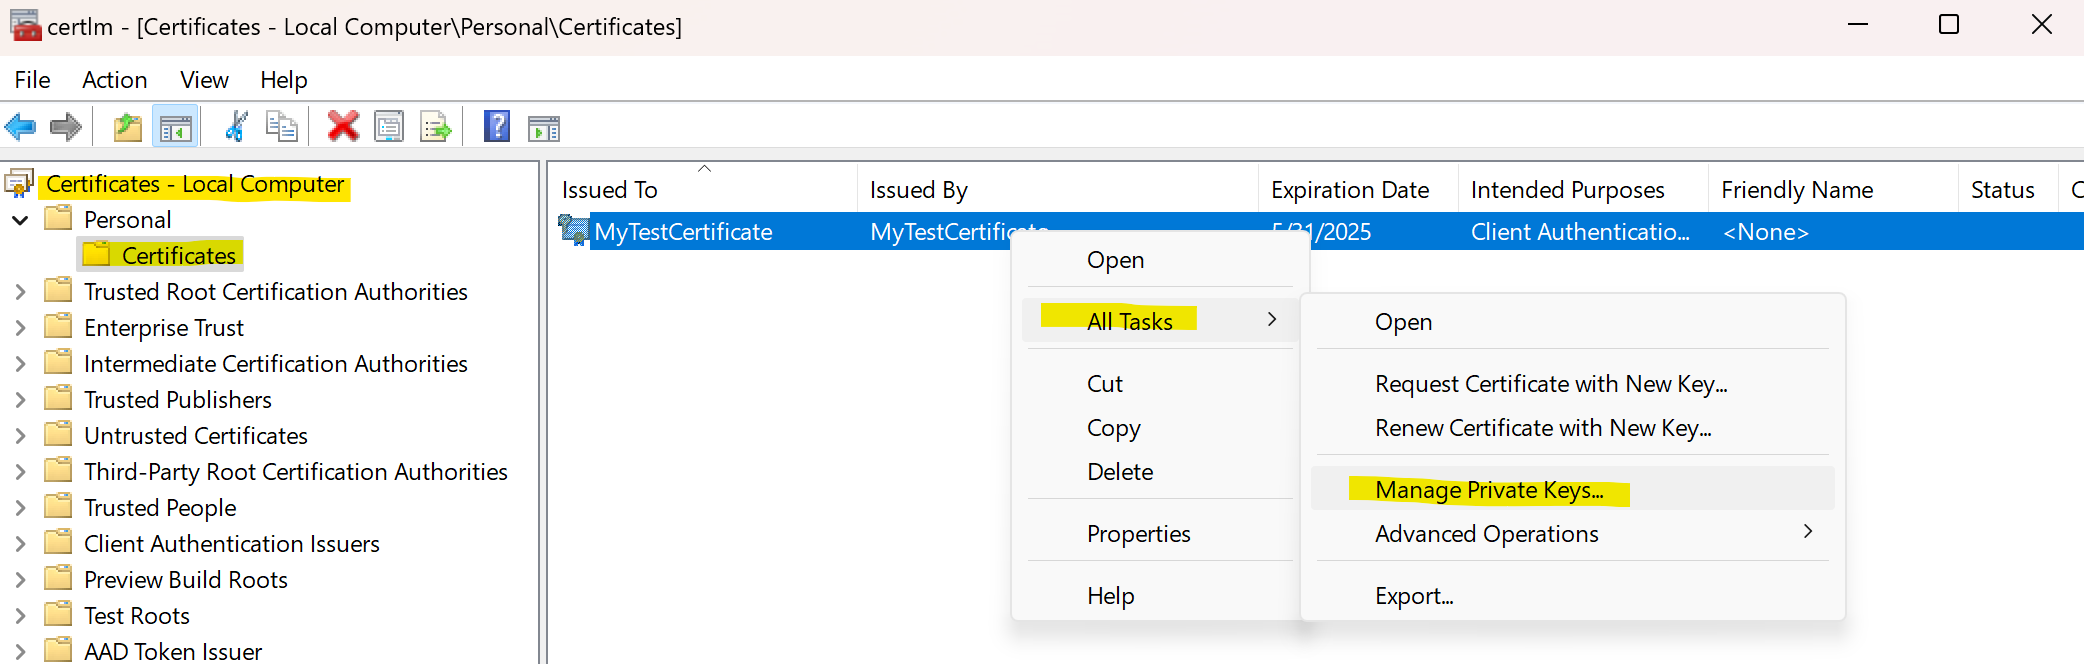
After you generate or import a certificate to your machine, you might want to configure permissions so the user account executing your application can access it in the certificate store. In my case, I just allowed all users on my machine to read the certificate’s private keys, so I don’t need to run it with elevated permissions:
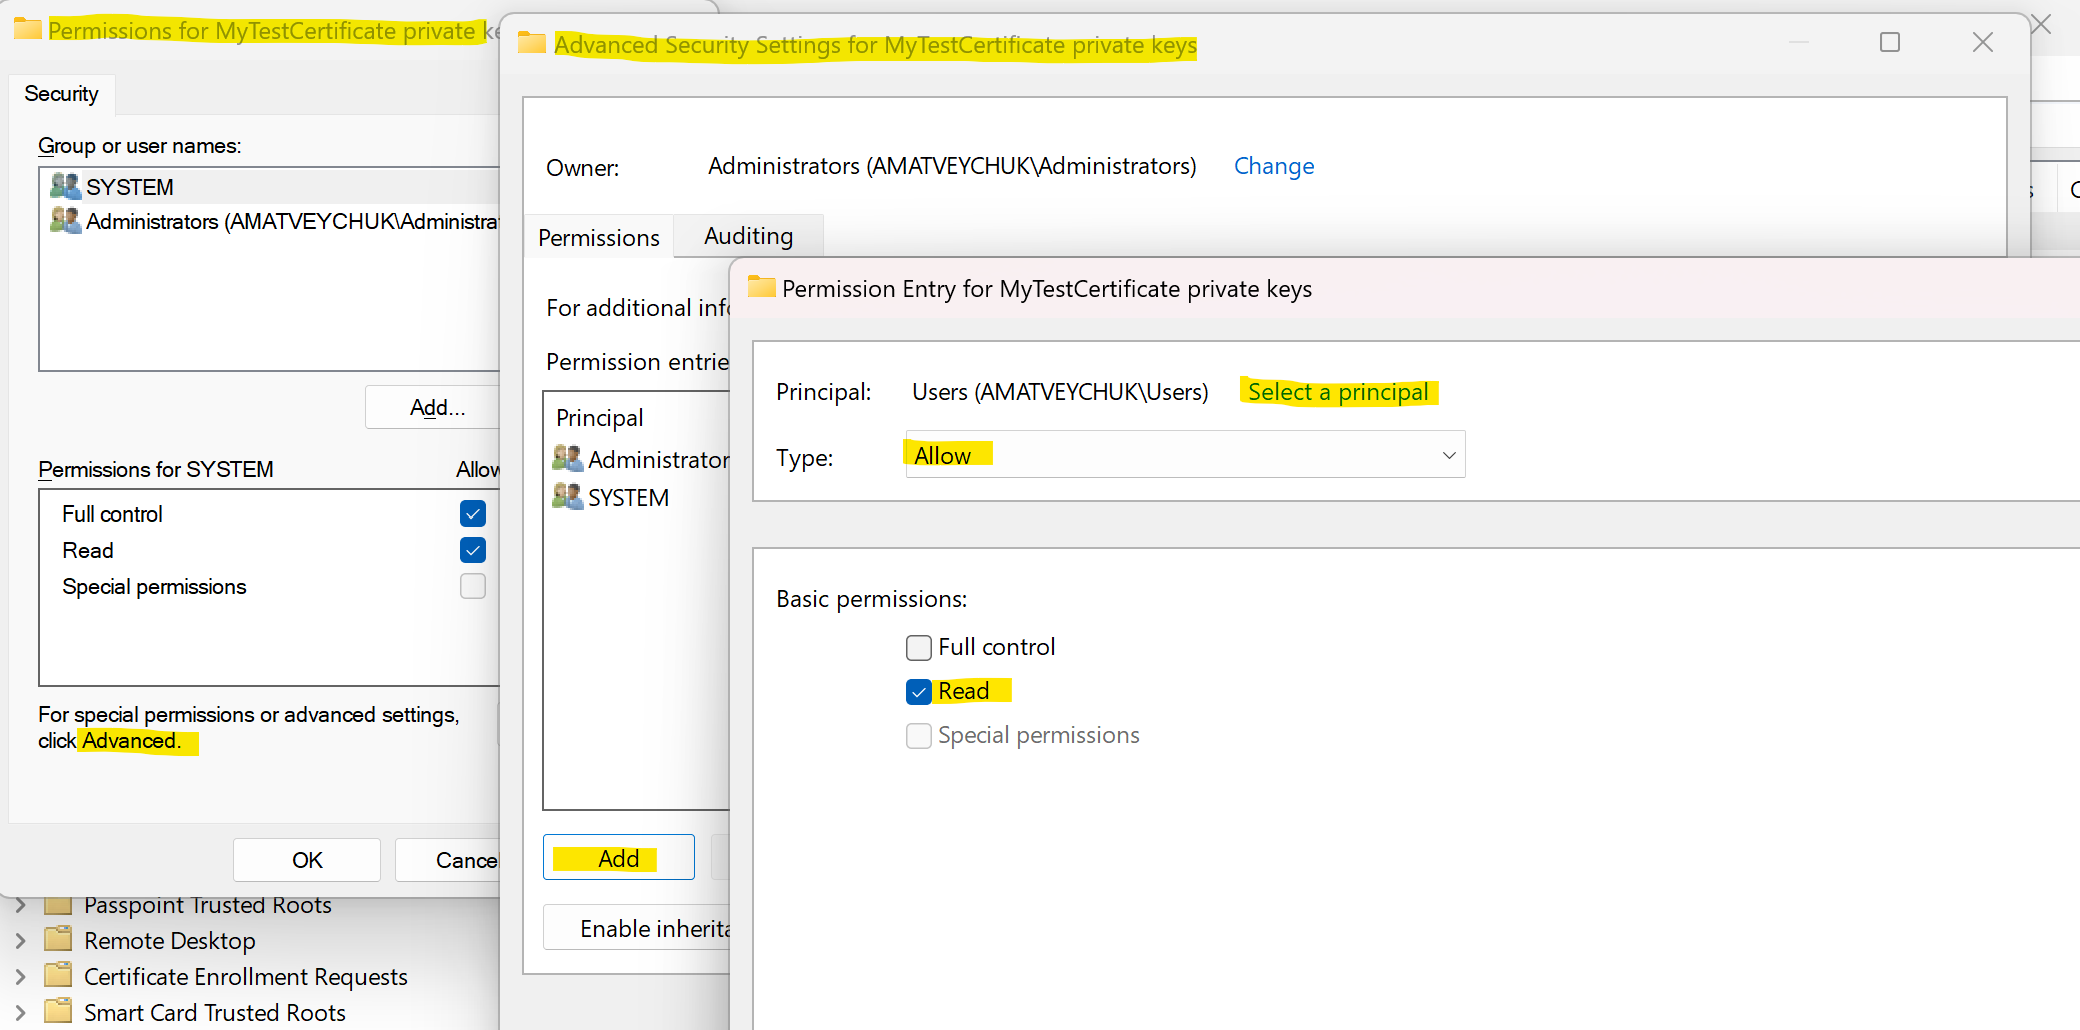
In a production setup, access to your certificates should be narrowed only to a specific user or local service identity used to run your application.
The next question is how to use that certificate in your application for authentication.
Using certificates in your code to authenticate to Azure app registrations
First, let’s see how we can retrieve our certificate from the certificate store and use it with the specialized ClientCertificateCredential class to understand the low-level work with certificates. Later, I will show how to abstract those details and use the DefaultAzureCredential class as a suggested approach.
So, what does that code do? First, it is trying to access the Local Machine certificate store, which we used to store our self-generated certificate. Next, it’s looking for the certificate in that store using its unique thumbprint. The Find method of the certificate store class (X509Store) returns a certificate collection rather than a single certificate object, as you might search by certificate name and the store might contain a few certificates with the same name. If the collection is not empty, we just use the first collection item as our certificate (in our example, there will always be no more than one item, as we search by certificate thumbprint, which is unique for each certificate). Then, we use that certificate to initiate a ClientCertificateCredential object and read a Key Vault secret using the Azure Key Vault secret client library for .NET.
Here, I use Key Vault as a target service to access in Azure to demonstrate the concept and to have some values to output in the demo console app. In real life, Key Vaults might be used to store secrets, keys and other certificates required for an application to access other services. On how to cache Azure Key Vault secrets, take a look at the following article: Cache certain responses from Key Vault.
If you configured everything correctly, you should see your Key Vault secret value in the console.
The drawback of that approach is that you explicitly rely on the certificate-based authentication method only in your application. If you later need to switch to another authentication method, you will need to modify your code and rebuild and redeploy your app. Plus, that approach won’t work in Linux environments, as there is no single designated certificate store. A better way would be to extract authentication configuration options into config files or environment variables so you can later change your authentication method without touching the application code.
The DefaultAzureCredential class has a built-in fallback mechanism that attempts to use multiple authentication methods in a specific order. So, let’s see how we can simplify the code and make it more portable.
As you can see, you no longer need to do any low-level work fetching and using certificates in your code. You delegate that part to the DefaultAzureCredential class, which, first in sequence, tries to use the authentication method specified via environment variables.
In our case, we need to set the following environment variables to use certificate-based authentication:
- AZURE_CLIENT_ID, which is an application ID of your application registration,
- AZURE_TENANT_ID, which is your Azure tenant ID,
- AZURE_CLIENT_CERTIFICATE_PATH, which is your local path to a certificate file containing its private key,
- AZURE_CLIENT_CERTIFICATE_PASSWORD (optional), which is required to read the password-protected certificate file,
- KEY_VAULT_NAME (code-specific) represents your Azure Key Vault name, so you don’t have it hardcoded in your application.
Unfortunately, you can only reference certificates stored locally in files when using that approach. On the one hand, it makes your application more portable, as you can read a certificate from a file both on Windows and Linux. On the other hand, it makes protecting your certificate’s private key harder, as you need to handle the password protecting the key, similar to handling a client secret. Plus, you should restrict access to the certificate file.
What can be done if you don’t want to lock to a specific credential type in your application and prefer storing your client certificate in a Windows Certificate Store? In that scenario, you can use Microsoft.Extensions.Azure library to create different credential types from key-value pairs defined in appsettings.json and other configuration files. The modified code might look like the following:
We register our target Azure service with the AddAzureClients method, and it will be automatically configured with a configured instance of a credential type. All credential configuration details will be specified in the following appsettings.json file:
In the sample above, we authenticate using the ClientCertificateCredential type and retrieve the certificate from the local certificate store, as in the initial sample code.
Unfortunately, there seems to be no way to explicitly configure the retrieval of a certificate from a file using that approach. So, if you need to run your application on a Linux host, you can reduct your appsettings.json file to use the DefaultAzureCredential class provided that you define the environment variables for certificate-based authentication, as in the previous example:
The last approach is more flexible than the option with environment variables only, as you can choose where to store your certificate depending on your host environment.
What’s next
If you followed till the end of this post, you might conclude that using certificates to authenticate to Azure services is not easy. There are a lot of nuances about managing and securing access to certificates. Also, configuring your application to use certificate-based authorization is not as straightforward as using the DefaultAzureCredential class and putting client secrets in environment variables. However, I hope that provided samples will help you better understand how to implement certificate-based authentication in your applications.
You can also check the sample code for certificate-based authentication in my GitHub repository: azure.authentication-samples.
In the next post in this series, I will show how you can simplify such an authentication process in your apps using managed identities. So, stay tuned and hit the subscribe button! 👇

Member discussion: